If you are like me, you don’t have a ton of space for vegetable gardening. So this summer, I’m going to work hard to bring innovative gardening to my yard. My first experiment is with a pallet – so far, so good. I’m excited to share my pallet gardening process with you here….

First things first, this project is about repurposing a product. I’m excited to say the project is very inexpensive and is great for the environment. If you see a company that has a pile of pallets sitting around, they will most likely give you one or two or ten of them. They don’t want them, but you do, so just ask. I was able to pick a few up from my favorite garden center, The Garden Supply Company in Cary, NC. Special thanks to the folks over there.
Lets get started!
Supplies Needed:
- Plants
- Dirt
- Pallet
- Burlap
- Chicken wire, unless you can secure some really heavy-duty burlap
Step 1: Choosing your pallet
Its best if you have the opportunity to look through the pile of pallets and choose which one will work best for you. Be picky!!! Choose one that doesn’t have a lot of nails sticking out. Make sure it still has most of its structure as you’ll need that support to hold everything in. You don’t want a pallet that is missing a lot of slats. Before leaving, make sure to flash your pearly whites to the person that is graciously giving you the pallet (and remember a good ol’ southern hug goes a long way).
Step 2: Preparing the pallet
Once you have all of your supplies in front of you, set aside at least one hour for the assembly. After you’ve inspected the pallet for any lose staples or nails, give it a good cleaning – scrub brush, hose, and dish soap style. Before the cleaning you might decide that some of the slats in the pallet need to be removed. I was fortunate enough to score a pallet that had the perfect distance between the slats for planting. However, some pallets have several slats side-by-side (much like your back deck) and need to be modified to fit your gardening needs.
Step 3: Assembling the pallet
Flip the pallet to the back side. You’ll staple or nail the burlap to the back and sides (although my next pallet may have its sides left open so that I have other places for planting). Burlap can be purchased in the form of a roll from garden centers, home improvement stores or even farm supply stores. If you are able to find burlap that is free and was used for something else in its previous life – even better! If you are so lucky to find used burlap, we’d love to hear where you got it.
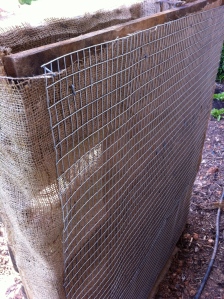
Prior to adhering the berlap to the back, its a good idea to make some “shelves” . This is a way to control where the dirt goes – once the pallet is standing up, its hard to keep the dirt from falling out of the front slats. Use burlap to make these little shelves and place them where you think they will be most beneficial. For my pallet, I did not use the shelving method for every row. Staple the burlap in such a way that makes them invisible to the front side. Keep in mind that the picture below is the back side of the pallet. When you look at the finished product, you should not be able to tell that the shelves are part of the pallet.

Now that your shelves are in place it is time to cover the back and remaining sides you do not want to plant. Roll the burlap (or piece together your free pieces) onto the back and anywhere else you want to cover, such as the sides. Secure the burlap in place with staples or nails. We found it was difficult to use staples in our pallet because of the hard wood used to make the pallet and because of the small sized stapler we were using. Eventually we used a combination of staples and nails to make it work.
This next step is necessary if you do not have heavy duty burlap. The burlap I used was pretty flimsy so I needed a way to reinforce the back so that I could fill the pallet with dirt and plants. To do this, I nailed old chicken wire to the back (this is another item you may be able to find for free somewhere). If you are fortunate enough to find a supply of used chicken wire for reuse, let us know.
Step 4: Planting the pallet
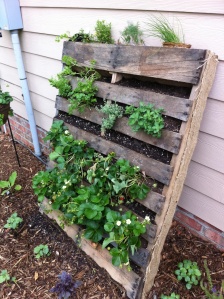
Here’s where the fun begins! Sadly, I didn’t take pictures once I started filling in the pallet with dirt, but I think you can get the idea. Start at the bottom. Once you get a base of dirt, add your plants. Dirt is important here. Think of the pallet as a container. You do not want to go out and by planting mix, which is used for planting directly in the ground. If you want to purchase ready-mixed soil, be sure to get an organic potting soil suitable for vegetables. I used a combination of potting soil and black cow (AKA cow manure). I recommend using small plants – they have all summer to grow! My strawberry plants were a bit large. I really had to rough them up to get them in the pallet. If you do have to rough up the roots, don’t worry, they can handle it as long as they stay in tact. Work your way on up the pallet until it is filled up. Just remember the plants are going to grow, so don’t crowd too much in there. I chose strawberries for the bottom two layers. If I had purchased more strawberries, I would have filled the whole pallet – they seem to be doing so well and the strawberries are very visible and easy to pick. The bottom two rows of my pallet are filled with strawberries and the top rows are filled with herbs. Other plants that would work well are flowers. How pretty would this be filled with flowers?!? I just might have to plant one of those next. I think lettuce would also work well. When choosing your plants, just keep in mind the growth habit. Tomatoes and other plants that grow tall and upright probably aren’t the best choice. You also don’t want to plant things that require too much room for their roots, like potatoes and onions.
Step 4: Watering and Fertilizing
Your new vertical garden needs to be watered daily, especially if you live down South. Our summers are so harsh. If it is a sun-loving flower garden or a vegetable garden it will need to be in a sunny location, so it’ll need lots of water. Check on it every day. You’ll need to water it twice during really hot days. My next pallet will have drip irrigation installed – that way I can be sure it gets watering even when I’m not around to provide it. I’ll be positing a few picture once I’ve completed that project.
Fertilize as you would normally. I highly recommend Garden Tone. Its an organic fertilizer that I’ve been using for years.
Well there you have it! My vertical pallet garden fits nicely with the other plants in my garden. I actually picked a salad for lunch today. I can’t wait for my onions, okra, tomatoes, and eggplant to bear fruit!
I will soon be planting squash and watermelon. Since they hog up so much room, I have ideas for taking them vertical. You’ll just have to check back to see what innovative design I create for that!
Happy Gardening!!!!

Happy Gardening!
Much Love, Heather Foust
Exterior Spaces


